
Seeding Solutions For All Your Lawn Care Needs
From fixing small bare patches to complete lawn do-overs, we’ve got the tips your customers need to grow new grass right the first time.

Topics: Best Time to Seed | DIY Repairs – Patching | DIY Repairs – Over-seeding | Lawn Renovation – Re-seeding | Future Lawn Maintenance
Lawn seeding projects come in all shapes and sizes depending on the current state of someone’s lawn – From fixing small dead patches to complete lawn renovation. No matter what seeding project is needed, we have a solution. Here are some expert tips to help you tackle your next lawn project.
The Best Time To Seed
The best time of year to tackle a seeding project varies depending on where you’re located. If you live in the North, you will have the best success in the spring or fall. The ideal conditions for seeding are warm soil, cool air temperatures, and plenty of rain (or water). In the South, late spring through mid-summer is preferred for seeding since warm-season grasses need warmer soil temperatures to germinate.
Lawn Projects: DIY Repairs
Even with regular feedings and proper maintenance, lawns may occasionally need to be repaired. Extreme heat, periods of drought, insects, disease, and normal wear and tear can make lawns look worn and tired. There are 2 seeding projects ideal for repairing your lawn: patching and over-seeding.
Bare Spot Repair: Patching
Bare spots in lawns are a common problem, but fortunately, they are easy to fix. Repairing bare spots not only makes your lawn lush and more enjoyable, it also helps prevent bigger problems, like weed invasions, from happening later. To repair bare spots in lawns, follow these steps.
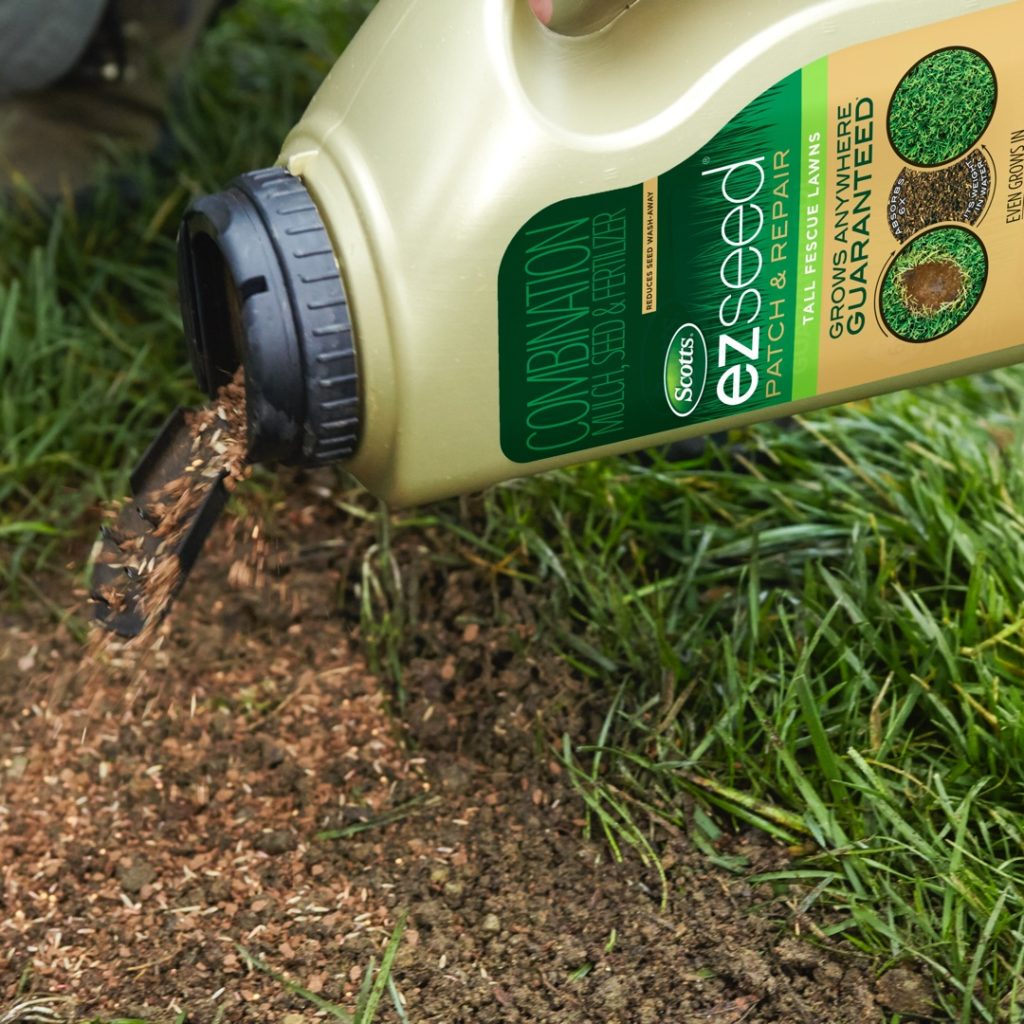
- Choose a patching product. Scotts® EZ Seed® Patch & Repair is specially designed for patching bare spots in the lawn. It’s an all-in-one product containing Scotts® high-performance grass seed, premium continuous-release lawn food, and a super-absorbent growing material that helps keep the seed from drying out. And the best part is it’s easy to use, and the results are guaranteed! (Subject to proper care.)
- Prep the area. Before applying Scotts® EZ Seed®, simply rake the ground to remove any debris (like dead grass and weeds) and loosen the soil to help the tiny seedlings take root once they sprout.
- Apply the product. Scotts® EZ Seed® should be applied so that the bare spot is mostly covered but the ground beneath is still visible. When watered, the mulch in the product will expand to fill the entire area and help keep the seed covered and moist.
- Water well. Thoroughly water the newly seeded area until no more water is absorbed. When Scotts® EZ Seed® turns light brown, it’s time to water again. Continue to water daily (or as needed) for at least 2 weeks or until the seedlings are 2 inches tall.
Thin Lawn Repair: Over-seeding
With each passing year, the wear and tear on lawns can cause it to become thin and weak even with regular feedings. Thin, weak grass is also a welcome invitation for weeds to move in and make your lawn their home. Over-seeding, or thin lawn repair, is a quick, inexpensive way to help return worn-out, tired grass to its former lush, green glory. If your customer wants a thicker, greener lawn, follow these steps.
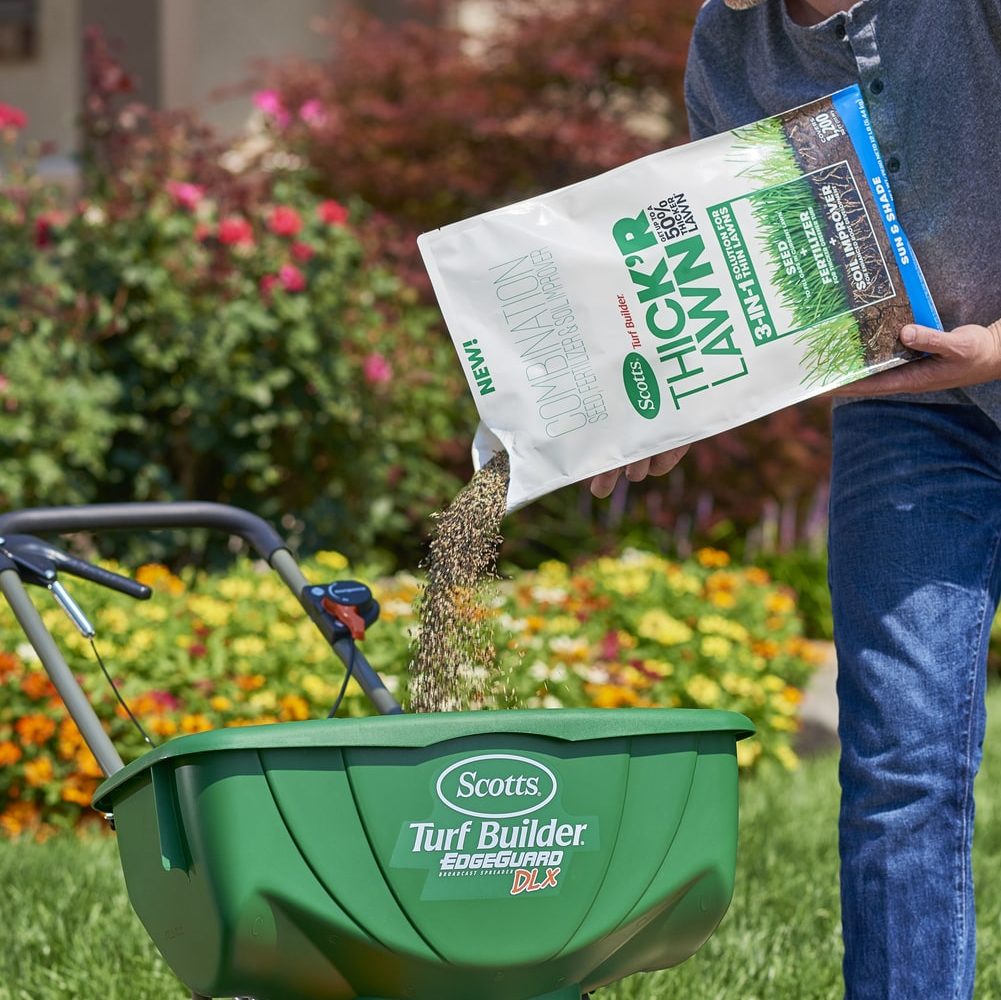
- Choose an overseeding product. If lawns contain cool-season grasses (Kentucky bluegrass, fine fescue, perennial ryegrass, or tall fescue), choose Scotts® Turf Builder® Thick’R Lawn™, a 3-in-1 solution uniquely formulated to help turn weak, thin grass into a thicker, greener lawn with stronger roots in a single application. This product combines Scotts® high-performance grass seed with fertilizer and a soil improver to create an easy-to-use product. However, if you live in the South and your lawn contains a warm-season grass type (bermuda, zoysia, centipede, or bahia), choose a Scotts® Turf Builder® Grass Seed that matches your current lawn.
- Mow low. Set the mower to one of its lowest settings and cut the grass so that it’s no more than 2 inches tall. Be sure to bag the clippings as it is mowed – it will make the next step easier.
- Prep the area. After mowing, rake the lawn to remove any remaining dead grass and debris and loosen the top layer of soil. This will help the grass seedlings take root once they sprout.
- Apply the product. This is the easy part. Simply fill up your spreader with Scotts® Turf Builder® Thick’R Lawn™ or Scotts® Turf Builder® Grass Seed, adjust the spreader settings according to the label directions, and apply.
- Water regularly. Keep the soil surface moist by watering daily or as needed for the first 2 weeks. Resume mowing when the lawn reaches the desired mowing height.
Lawn Renovation Projects
Sometimes a lawn will simply reach the point of no return. If your lawn is showing signs of significant damage, a lawn renovation project might be the best way for you to get a green, thick lawn to enjoy.
Start a New Lawn: Re-seeding
When a lawn is more weeds than grass, or is dry and damaged beyond repair, it’s time for a complete do-over. A reseeding project lets your customers start your lawn over with a clean slate. Just follow these steps.
- Clear the area. Start by killing any remaining poor-looking grass and all weeds with a non-selective herbicide about 2 weeks before you want to seed your lawn. After everything is dead, rake the area to remove the debris.
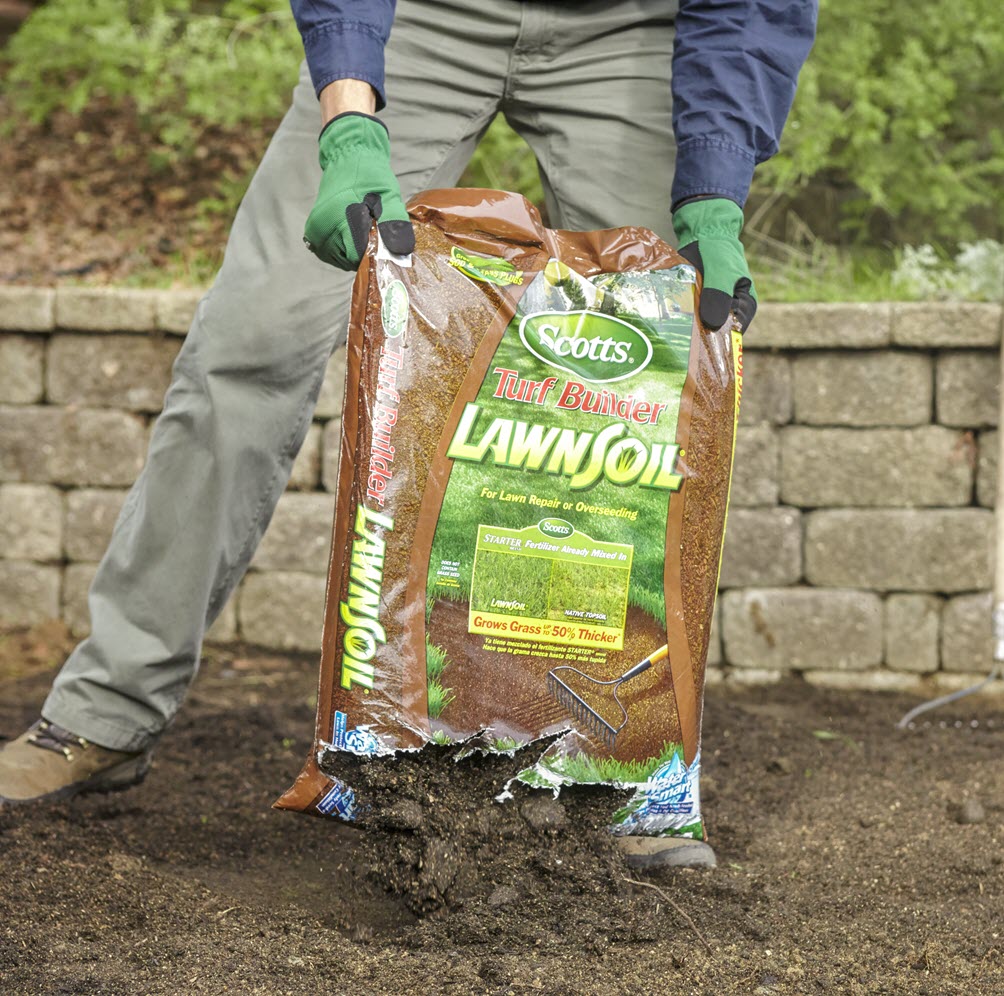
- Prep for success. If the soil is really compact, now is a great time to core aerate the area. After aerating, use a rake to level out any uneven areas and loosen the top ¼ inch of soil. Then add a 1-inch layer of Scotts® LawnSoil™ evenly across the entire area. It’s specifically formulated to help grass seed germinate better and get off to a good start.
- Select a grass seed. Choose a Scotts® Turf Builder® Grass Seed that is right for your location. Be sure to take into consideration the growing conditions in your area: How much sun? How much rain? How much wear and tear from children and family pets?
- Apply the product. Once the soil is prepped, it’s time to seed. Just fill up a spreader with Scotts® Turf Builder® Grass Seed, adjust the spreader settings according to the label directions, and apply. Want to get the job done fast? Opt for the Scotts® Elite Spreader. With its 6-foot spread pattern, which will cover the lawn in fewer passes so it takes less time.
- Feed for growth. After spreading the grass seed, apply Scotts® Turf Builder® Starter® Lawn Food for New Grass to give developing seedlings needed nutrients so they can develop a deep root system faster. If you live in the North, your customers can apply Scotts® Turf Builder® Triple Action Built for Seeding instead. Not only will it give developing seedlings needed nutrients, but it also prevents listed weeds, like dandelion and crabgrass, for up to 6 weeks.
- Water daily. Proper watering is a critical step to seeding success. Keep the soil surface moist by watering daily or as needed until the seedling reach at least 2 inches tall.
Future Lawn Maintenance
Once the newly seeded areas reach a mowing height, it’s okay to start cutting it. Be sure your customers only remove the top ⅓ of the grass blades when they mow, and cut it at the highest setting ideal for the grass type (3 to 4 inches is most common.) After 6 to 8 weeks, start fertilizing the new grass regularly with Scotts® Turf Builder® Lawn Food to help keep it thick and green.